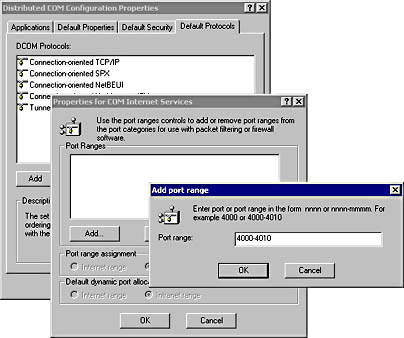
While the SCM always uses port 135 to initiate a remote request, the actual conversation between a client and a server occurs over a port number selected dynamically by COM+ in the range 1024 to 65535. While this technique is perfectly suitable for an intranet environment, in Internet scenarios, in which there is often a proxy server that filters outbound traffic from the client machine as well as some kind of firewall that limits incoming network traffic at the server, communication is more complex. Typically, the security software restricts COM+ to a narrow set of protocol and endpoint combinations. To allow administrators to control the range of ports from which COM+ chooses, you can use the Default Protocols tab of the Distributed COM Configuration utility to restrict the available ports, as shown in Figure 19-6.
Figure 19-6. Restricting COM+ to a limited range of ports.
Furthermore, port 135, which is used by the SCM, is often blocked by the firewall. To enable COM+ to work better in scenarios where the Internet is the vehicle for communication, COM+ supports the tunneling TCP/IP protocol. Tunneling TCP/IP uses a special handshake protocol at the beginning of each connection that is sent as HTTP traffic over port 80. After this initial handshake, all further COM+-generated traffic is sent via standard TCP/IP. Since part of the tunneling TCP/IP protocol is implemented as an Internet Server Application Programming Interface (ISAPI) extension and filter, this functionality works only in Internet scenarios where the Web server is Internet Information Server (IIS).5
To enable the use of tunneling TCP/IP on the client, you use the Distributed COM Configuration6 utility to execute these steps, as shown in Figure 19-7.
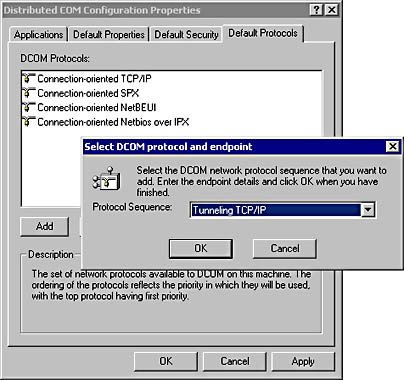
Figure 19-7. Adding the Tunneling TCP/IP protocol.
On the server, you must follow the same steps but also select the Enable COM Internet Services On This Computer check box on the Default Properties tab of the Distributed COM Configuration utility.7 On the server, you must also install the COM Internet Services Proxy. The client and server might also require additional configuration depending on whether a proxy server is used to connect to the Internet or whether an overly aggressive firewall is protecting the server. However, no coding changes are required to take advantage of the tunneling TCP/IP protocol.