A component identifies its type using a category identifier (CATID), which is identical to a 128-bit globally unique identifier. For example, any component that implements the CATID {40FC6ED4-2438-11CF-A3DB-080036F12502} is a control, and any component that implements the CATID {F0B7A1A1-9847-11CF-8F20-00805F2CD064} is an active scripting engine. By design, component categories are extensible, which means that you can define additional CATIDs for custom component types. Of course, it is strongly recommended that you use an existing component category if it meets your needs. Like the signature of an interface, the semantics of a CATID are immutable. You must define a new component category instead of expanding the required interfaces for an existing component type.
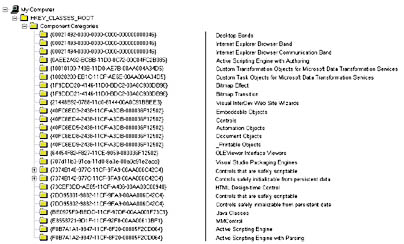
The defined CATIDs on an individual machine are stored in the HKEY_CLASSES_ROOT\Component Categories section of the registry. Stored with each CATID value is a human-readable name that describes the category. Figure 7-2 shows the standard CATIDs that can be easily located in the registry.
Figure 7-2. Some standard CATIDs.
An object declares its support for a particular component category using the Implemented Categories registry key. An object can support multiple component categories by listing all its supported CATIDs in the registry. Component categories can also be a two-way street. Not only can a client search for components that are members of a certain category, but a component can also declare that it requires certain functionality of the client. If a component does not indicate the type of client it is willing to work with, the user might select a component only to discover that it won't work with the application. An object declares categories of acceptable clients using the Required Categories registry key. You should use this registry key with restraint because it severely limits the clients that can access an object.
Figure 7-3 shows a hypothetical registry entry for a coclass. Based on this information, we can deduce that the object is a control that requires a container to support Visual Basic-style data binding.
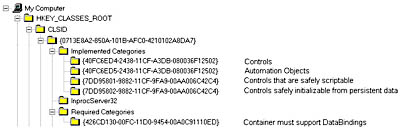
Figure 7-3. The registry entries for a coclass that uses the Required Categories subkey to specify required client functionality.
In some cases, it might be useful to associate a CATID with a default object. This technique allows clients to instantiate an object of a particular type without even knowing the object's CLSID! For example, imagine an e-mail application that checks the spelling of a message before it is sent. If the application does not care what spell checker component it uses, it can simply call CoCreateInstance with the CLSID parameter set to the CATID for spell checker components, as shown here:
// Instantiate the default object, implementing the // Spell Checker component category. CoCreateInstance(CATID_SpellChecker, NULL, CLSCTX_INPROC_SERVER, IID_IUnknown, (void**)&pUnknown); // Now we know that the object must support the // ISpellChecker interface. pUnknown->QueryInterface(IID_ISpellChecker, (void**)&pSpell); |
CoCreateInstance locates the default spell checker by looking in the HKEY_CLASSES_ROOT\CLSID section of the registry for the particular CATID. The CATID is defined there using the TreatAs subkey, which references the CLSID of the spell checker component, as shown in Figure 7-4.
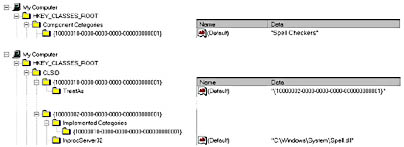
Figure 7-4. The default component of a certain category, referenced in the HKEY_CLASSES_ROOT\CLSID|{ComponentCategoryID}\TreatAs registry key.
This mechanism can be helpful when you don't want to tie a client program to a particular CLSID and you also don't want to force the user to select from a list of available components. You can design an application so that the setup program asks the user to make a selection during the installation process and then configures that component as the default.
You can also define a default icon for every component category. This might allow an application to present the user with different icons for components that belong to different categories. Default icons come in two standard sizes, the standard 32-by-32-pixel icon and the smaller 16-by-16-pixel icon that is typically displayed on toolbox buttons. To associate a standard-sized icon with a specific component category, you create a subkey of HKEY_CLASSES_ROOT\CLSID with the component category's CATID and populate that key with a DefaultIcon subkey. For a toolbox-sized icon, you use the ToolBoxBitmap32 subkey.
The registry entry for the OLEViewer Interface Viewers component category used by the OLE/COM Object Viewer utility is shown in Figure 7-5. The icon is identified by a number, which references a resource stored in the component. Incidentally, the OLE/COM Object Viewer displays the toolbox-sized icon for all component categories that have one configured.

Figure 7-5. The icon configured for the OLEViewer Interface Viewers component category.
As a coclass evolves, it can add support for new interfaces or drop support for older ones. In most cases, a new version of an existing coclass should be assigned a new CLSID so that a client application can specify the class it wants. Client applications that predate the new version of a component use the older coclass. If the new version of a coclass is fully backward-compatible with the older version, it might make sense for older clients to be routed to the new class.
The CoTreatAsClass and CoGetTreatAsClass functions allow a coclass represented by a CLSID to evolve over time while still supporting older clients. You can call the CoTreatAsClass function to insert the TreatAs subkey into the registry entry of a particular CLSID. Any client requests for that CLSID will be automatically routed to the CLSID specified by the TreatAs key. You can use the CoGetTreatAsClass function to learn the current emulation setting of a specific CLSID.
Let's say that the CLSID_InsideCOM coclass is extended and that the class identifier CLSID_InsideCOM2 identifies the new version. If the new version of the class is backward-compatible, you can call the CoTreatAsClass function to configure class emulation, as shown in the following code fragment:
hr = CoTreatAsClass(CLSID_InsideCOM, CLSID_InsideCOM2); |
This code configures the registry so that the CLSID_InsideCOM2 class is used even when clients request the CLSID_InsideCOM class—for example, via a call to CoCreateInstance. The actual registry entries in place after the execution of the CoTreatAsClass function are shown in Figure 7-6.
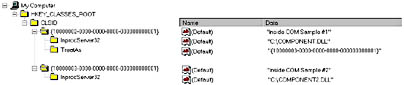
Figure 7-6. The effect of the CoTreatAsClass function on the registry.