You can think of a type library as a binary version of an IDL file. The type library contains a binary description of the interfaces exposed by the classes in a component and defines their methods, parameters, and return types. Many environments have built-in support for type libraries: Visual Basic, Visual J++, and Microsoft Visual C++, as well as Borland Delphi, Microsoft Visual FoxPro, and Visual Basic for Applications (VBA), the version of Visual Basic embedded in the Microsoft Office applications. Rumor has it that the next version of Microsoft (Visual) Macro Assembler might also support COM+ via type libraries.
Microsoft has defined the COM+ interfaces for building type libraries—ICreateTypeLib(2) and ICreateTypeInfo(2)—and for reading type libraries—ITypeLib(2) and ITypeInfo(2). Microsoft also provides a standard implementation of these interfaces that is available to all applications as part of the system file oleaut32.dll. Few programs other than the MIDL compiler have any need for the interfaces used to build type libraries,1 but Visual C++, Visual J++, and Visual Basic can all read type libraries. What is the advantage of describing your interfaces in a type library? Because a type library provides nearly complete2 information about your interfaces to anyone who is interested, sophisticated modern programming tools can read this information and present it to programmers in an accessible format, making feasible the integration of COM+ components built in different programming languages.
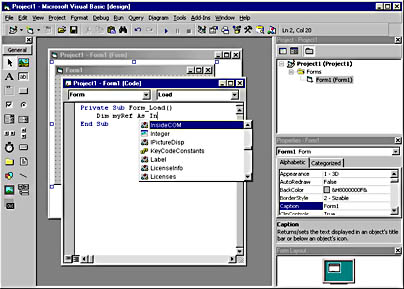
One simple example of a use for type information can be seen in Visual Basic,3 which has an automatic code completion feature that displays a drop-down list while you write code, as shown in Figure 3-1. The statement builder drop-down list makes code suggestions. To insert an item into your code, you simply double-click it or press the Tab key while it is selected. If the selected item is a method, Visual Basic displays all of its parameters and their types. It retrieves all of this information from the type libraries of preselected components. As you'll see, the profound importance of type libraries to language integration in COM+ extends far beyond this simple example.
Figure 3-1. The statement builder feature in Visual Basic.
While you can build a type library manually using the system implementations of the ICreateTypeLib(2) and ICreateTypeInfo(2) interfaces, it is much easier to use the MIDL compiler. With a few simple changes, you can compile the ISum interface definition presented in Chapter 2 into a binary type library (.tlb) file using the MIDL compiler. The improved IDL file that tells the MIDL compiler to generate a type library for our component is shown in Listing 3-1; the additions are shown in boldface.
component.idl
import "unknwn.idl";

[ object, uuid(10000001-0000-0000-0000-000000000001) ]
interface ISum : IUnknown
{
    HRESULT Sum(int x, int y, [out, retval] int* retval);
}

[ uuid(10000003-0000-0000-0000-000000000001),
  helpstring("Inside COM+ Component Type Library"),
  version(1.0) ]
library Component
{
    importlib("stdole32.tlb");
    interface ISum;

    [ uuid(10000002-0000-0000-0000-000000000001) ]
    coclass InsideCOM
    {
        interface ISum;
    }
};
|
Listing 3-1. The component.idl file from Chapter 2 expanded to include type library information.
To instruct MIDL to generate a type library, you must add the library keyword to the IDL file. Anything defined in the library section of the IDL file is added to the type library. The library has a universally unique identifier (UUID) defined for it and contains a coclass (COM+ class) statement that lists the interfaces supported by a COM+ class. In this case, the InsideCOM coclass supports only one interface: ISum. The version attribute specifies the version number of the type library only; it does not convey version information for the interface or the class. The system type library file, stdole32.tlb, provides definitions of the IUnknown, IDispatch, and IEnumVARIANT interfaces that are specially designed for use in high-level languages such as Visual Basic and Java that rely on type libraries for their COM+ integration features. The importlib IDL statement references this information in the new type library; all type libraries should bring in the base types defined in stdole32.tlb.
You can use the helpstring attribute to describe a type library, coclass, interface, method, or any other element in a type library. Applications often use this information to provide a user-friendly name for a component. Visual Basic, for example, uses these strings in the References dialog box, shown in Figure 32, to present the user with a selection of available components. Using this dialog box, you can set a reference to the type library stored inside a component. The type library provides Visual Basic with enough information to access the component.
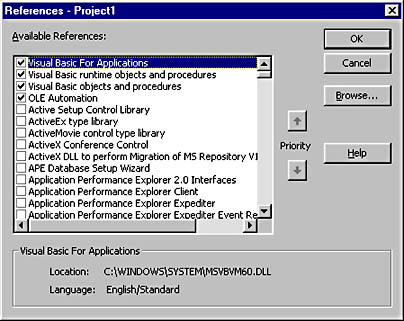
Figure 3-2. The Visual Basic References dialog box.
Because COM+ provides a language-independent binary standard, it must play referee among all the different data types used in the languages that support COM+. For example, the 32-bit integer arguments used by the Sum method declared in Listing 3-1 are treated as Long values by Visual Basic. The following table shows the type mappings between IDL types and the native C++, Visual Basic, and Java types. You'll see a blank if an IDL type cannot be automatically converted into a native type.
| IDL Type | C++ | Visual Basic | Java |
|---|---|---|---|
| signed char | signed char | byte | |
| unsigned char | unsigned char | Byte | |
| wchar_t | wchar_t | Integer | char |
| signed short | short | Integer | short |
| unsigned short | unsigned short | ||
| signed int | int | Long | int |
| unsigned int | unsigned int | ||
| signed hyper | __int64 | long | |
| float | float | Single | float |
| double | double | Double | double |
| BSTR | BSTR | String | java.lang.String |
| boolean | bool | Boolean | boolean |
| VARIANT | VARIANT | Variant | com.ms.com.Variant |
| DATE | DATE | Date | double |
| CY | CY | Currency | long |
| SAFEARRAY | SAFEARRAY | [] (a standard Visual Basic array) | com.ms.com.SafeArray |
| IUnknown* | IUnknown* | IUnknown | com.ms.com.IUnknown |
| IDispatch* | IDispatch* | Object | java.lang.Object |
Instead of leaving a component's type library as a separate .tlb file, you can embed the type library in the component as a resource. This makes your component neater, because the file includes both the component and the type information that describes how to use it. To include a type library as a resource in a C++ component, you must first create a resource script (.rc) file, as shown in Listing 3-2. When the resource file is compiled, the type library will be added and then linked with the component file. Components written in Visual Basic and Visual J++ automatically have their type libraries embedded in the component file.
component.rc
1 TYPELIB "component.tlb" |
Listing 3-2. A resource script file that includes a type library in a component.
Before an application can make use of a type library, the type library must be entered into the registry. Languages such as Visual Basic and Visual J++ scour the registry for components that contain type libraries. To register a type library, you insert the necessary entries under the HKEY_CLASSES_ROOT\TypeLib key in the registry. This key declares each type library installed on the system. A library identifier (LIBID) consists of a globally unique identifier (GUID) that identifies each registered type library. The LIBID corresponds to the UUID defined by the library statement in the IDL. Every LIBID key in the registry contains several subkeys that specify the version number of the type library, the path to that library, several flags, and an optional path to a directory that contains help files with information about the contents of the type library.
As shown in Chapter 2, you can use a registration (.reg) file to create these registry entries. It is preferable, however, to integrate the type library registration with the component self-registration steps. Programmatically registering a type library is as easy as calling the LoadTypeLibEx function.4 You can use this call to create all the necessary entries automatically. In addition to filling in a complete registry entry under the TypeLib key, the function adds entries for each of the Automation-compatible interfaces (including dual interfaces) defined in the type library. (Dual interfaces are described in Chapter 5.) This information is required for marshaling purposes. Note that LoadTypeLibEx and RegisterTypeLib do not register COM+ objects, only type libraries. That is, registry entries are created only in HKEY_CLASSES_ROOT\TypeLib and HKEY_CLASSES_ROOT\Interface—not in HKEY_CLASSES_ROOT\CLSID. Registering COM+ objects is the responsibility of the component self-registration code.
Two other utility functions can prove helpful when you work with type libraries. The UnRegisterTypeLib function removes the specified type library information from the registry. This function is typically called by setup programs during the uninstall phase. In-process components often call this function in the DllUnregisterServer function. The QueryPathOfRegTypeLib function returns the path of an already registered type library.
The HKEY_CLASSES_ROOT\Interface key contains information about each registered interface available on the system that has an interface identifier (IID). This section begins with {00000000-0000-0000-C000-000000000046}, the IID of the IUnknown interface, and then proceeds with some standard COM+ interfaces, such as IClassFactory, IMalloc, and IMarshal, before heading off into some of the more esoteric interfaces, such as IExternalConnection, and finally into custom interfaces. One IID subkey under HKEY_CLASSES_ROOT\Interface is required for each new interface your application defines. The IID subkey might contain additional subkeys; these are listed in the following table.
| Subkeys of HKEY_CLASSES_ROOT\Interface\{YourIID} | Description |
|---|---|
| BaseInterface | Identifies the interface from which the current interface is derived |
| NumMethods | Specifies the number of methods in the associated interface |
| ProxyStubClsid32 | Identifies the CLSID of the 32-bit proxy/stub DLL that knows how to marshal this interface |
| TypeLib | Specifies the LIBID associated with the type library in which the interface is described |
The following code is an improved version of the self-registration code that calls LoadTypeLibEx to register the component's type library; changes are shown in boldface. The first parameter of the LoadTypeLibEx function is the path and filename of the DLL file retrieved by the call to GetModuleFileName. This assumes that the type library has been embedded in the DLL file using a resource, as discussed previously. Because all COM+ functions require Unicode character strings, the C run-time function mbstowcs (Multi-Byte String To Wide Character String) is called to convert the string to a corresponding sequence of wide characters; OLECHAR is defined as a wchar_t in the system IDL file wTypes.idl. The second parameter of LoadTypeLibEx, REGKIND_REGISTER, is a flag indicating that the type library should be registered as well as loaded. You can use another flag, REGKIND_DEFAULT, to load a type library without registering. If the call succeeds, an ITypeLib interface pointer to the loaded (and in this case registered) type library is returned in the third parameter of LoadTypeLibEx. In our case, the only reason for loading the type library is to register it, so we can immediately free the type library by calling the Release method:
HRESULT __stdcall DllRegisterServer()
{
    char DllPath[MAX_PATH];
    GetModuleFileName(g_hInstance, DllPath, sizeof(DllPath));

    // Convert DllPath to wide characters
    OLECHAR wDllPath[MAX_PATH];
    mbstowcs(wDllPath, DllPath, sizeof(wDllPath));

    ITypeLib* pTypeLib;
    HRESULT hr =
        LoadTypeLibEx(wDllPath, REGKIND_REGISTER, &pTypeLib);
    if(FAILED(hr))
        return hr;
    pTypeLib->Release();

    return RegisterServerEx(g_regData, DllPath);
}

HRESULT __stdcall DllUnregisterServer()
{
    UnRegisterTypeLib(LIBID_Component, 1, 0,
        LANG_NEUTRAL, SYS_WIN32);
    return UnregisterServerEx(g_regData);
}
|
To build the type library project, you use the Type Libraries.dsw workspace file in the Samples\Language Integration folder on the companion CD. Building the Create TypeLib project in this workspace automatically compiles the IDL file using the MIDL compiler, thereby producing the type library file (component.tlb). Then you embed the type library in the component.dll file using the resource script file component.rc. Finally, you register the component by choosing Register Control from the Tools menu in Visual C++. The component should self-register successfully; you can see several new entries in the aforementioned areas of the registry.
The OLE/COM Object Viewer (oleview.exe) utility that comes with Visual C++ is useful when you explore the registry and type libraries, either as .tlb files or embedded within components. It can function as an alternative to the registry editor because it is designed specifically for viewing the registry information that pertains to COM+ objects. Another nice feature is its ability to reverse-engineer type libraries into their original IDL source code.
Let's see how we can use a type library to simplify the client application we built in Chapter 2. The easyclient.cpp application shown in Listing 3-3 uses the type library embedded in the component.dll file:
easyclient.cpp
#define _WIN32_DCOM
#import "component.dll" no_namespace

#include <iostream.h>

void main()
{
    CoInitializeEx(NULL, COINIT_APARTMENTTHREADED);
    ISumPtr myRef(__uuidof(InsideCOM));
    int result = myRef->Sum(5, 13);
    cout << "5 + 13 = " << result << endl;
    myRef = NULL;
    CoUninitialize();
}
|
Listing 3-3. A C++ client that uses the type library embedded in component.dll.
The first immediately apparent simplification is in the layout of the program. We've gone from over 30 lines of code without a type library to 12 lines of code with a type library. More important, the user no longer has to be a C++ or COM+ expert. How did the type library perform this magic? If you look at the first line of code, you'll see the answer: the #import directive. This Microsoft language extension incorporates information from a type library. It instructs the compiler to process the designated type library, converting the contents to C++ code that describes the interfaces contained in the type library.
When the C++ compiler encounters the #import directive, it generates two header files that reconstruct the type library's contents in C++ source code. The primary header file has the same name as the type library plus the .tlh (type library header) extension. This file is similar to the header file produced by the MIDL compiler—it contains the abstract base class definitions for the interfaces. The secondary header file, also with the same name as the type library but with the .tli (type library implementation) extension, contains the implementations of compiler-generated member functions and is included when you use the #include directive in the primary (.tlh) header file. Both header files are placed in the compiler's output directory. They are then read and compiled as if the .tlh file were named using a #include directive in the source code.
The most interesting aspect of these header files is their use of Microsoft's smart pointer template classes. But before we become engrossed in smart pointers, you should have a solid grounding in C++ template classes. If, like us, you struggle to keep up with the latest features of C++, Java, and Visual Basic, you might find the next section useful. If you are already a template guru, just skip to the section on smart pointers.
In C++, templates (sometimes called parameterized types) generate code based on a parameter's type. Using templates, you can design a single class that operates on data of many types instead of having to create a separate class for each type. The classic example of a template creates a function that compares two values and returns the greater one. In C, you could accomplish this task with a macro, as shown here:
#define max(a, b) ((a > b) ? a : b) |
Although macros of this sort are valid in C++, they are frowned upon because of their lack of type checking. For example, the compiler has no objection to code such as this:
max(60, 'b'); // Compiler says no problem! |
Macros can also lead to more insidious bugs like this:
int x = 6; cout << max(++x, 6) << endl; // Displays 8 |
The fact that this code prints the value 8 might seem odd—until you mentally expand the macro as the compiler does:
cout << ((++x, 6) ? ++x : 6) << endl; |
Because the preprocessor expands macros by substitution, the variable x is incremented twice.
Templates were added to the C++ language to address some of these issues. The template version of the preceding macro is shown here:
template <class T>
T max(T a, T b)
{
    return (a > b) ? a : b;
}
|
Templates come in two basic types: function templates and class templates. A function template defines a function that can accept arguments of any type, as shown in the preceding example. A class template defines an entire class that can be generalized to work with any type. The template keyword begins the definition of the template and is followed by the type argument enclosed in angle brackets (< and >). The class keyword indicates a type argument to a template, even though the actual type argument can be any type—it need not be a class. This keyword is followed by the actual function template definition, with the argument T representing the type. You can think of this argument as a variable representing the type of the actual parameter. You can use this function template for any of the following types:
max(10, 12);            // int
max(10.8, 12.5);        // float
max('a', 'b');          // char
max(true, false);       // bool
|
Because no macro substitution is used, the following code works fine:
int x = 6 cout << max(++x, 6) << endl; // Displays 7 |
Type checking is also enforced, making this code illegal:
max(60, 'b'); // Compiler says big problem! |
When a function template is first called for each type, the compiler creates an instantiation, or version, of the template function specialized for that type. This instantiation is called every time the function is used for the type. If you have several identical instantiations, even in different modules, only one copy of the instantiation ends up in the executable file. For example, max(10, 12) causes the compiler to generate the following code:
int max(int a, int b)
{
    return (a > b) ? a : b;
}
|
And max('a', 'b') generates this code:
char max(char a, char b)
{
    return (a > b) ? a : b;
}
|
Whereas macros have no overhead because the preprocessor expands them, you can minimize the overhead of templates using the inline keyword, which tells the compiler to insert a copy of the function body into each place the function is called. Inline functions can make a program faster because they eliminate the overhead associated with function calls (at the cost of making the resulting executable image larger because code is being duplicated in multiple places).
You can also override a template function to define special behavior for a specific type. Say you want to compare the lengths of two strings using the max function template. The standard version generated by the compiler would compare only the pointer addresses. The following code shows a function that overrides the compiler's default instantiation of the template to compare string lengths:
template<> char* max(char* a, char* b)
{
    return (strlen(a) > strlen(b)) ? a : b;
}
|
Now you can write code such as this:
cout << max("hello", "good-bye") << endl; // Displays good-bye.
|
You can use a class template to generalize an entire class so that it can work with any type. For example, a string class might need to work with single-byte characters as well as double-byte Unicode characters. Here is the definition of a rudimentary string template class:
template <class T> class String
{
struct sRep;
sRep* rep;
public:
String();
String(const T*);
String(const String&);
|
You can instantiate this template class for the regular character and a Unicode character, as shown here:
String<char> cs; String<wchar_t> ws; |
This review of C++ templates should give you enough information to get started with smart pointers. We'll revisit C++ templates later in this chapter in the section titled "The Active TemplateLibrary."
A smart pointer is an object that looks, acts, and feels like a normal pointer but offers greater functionality. Smart pointers are generally designed to make programming safer and easier. In C++, they are implemented as template classes that encapsulate a pointer and override standard pointer operators. What do smart pointers have to do with COM+? Because COM+ programming in raw C++ can be difficult and can lead to errors, smart pointers can improve the programmer's odds of success. Let's look at three aspects of standard smart pointers, with an eye toward how they can improve client-side COM+ programming:
Constructing a smart interface pointer can be as simple as initializing the pointer to NULL or as complex as calling CoCreateInstance(Ex) to retrieve a pointer to the requested interface. Normally, a smart pointer class's constructor is overloaded to support all of these capabilities. The destructor of a smart interface pointer can automatically call Release. A smart pointer can overload the assignment operator (=) so that any attempt to copy the pointer results in an automatic AddRef call, relieving the programmer of the burden of reference counting. Finally, the smart pointer class can override the indirection operator (*) to perform some basic error checking, ensuring that the internal "dumb" pointer is not NULL or invalid in some other way.
IUnknown is what makes the smart pointer concept so appealing in COM+. Because IUnknown is supported by all COM+ objects and has a unique and clearly defined set of methods and associated semantics, a smart pointer that wraps COM+ interface pointers can provide a lot of built-in functionality. For the most part, smart pointer classes are implemented as template classes because otherwise they would be useful only with a specific pointer type. For example, you could build a well-designed smart pointer class for IUnknown interface pointers, but this class would be of limited value to someone who wanted to access the ISum custom interface. Because you can use template classes to create generic wrappers to encapsulate pointers of almost any type and since interface pointers share similar semantics, you can build a template version of the smart pointer class, allowing the smart pointer to be used with any interface pointer type.
A simple smart pointer The idea of a smart pointer is relatively simple, and implementing its basic features is quite easy. However, building a commercial-grade smart pointer is a lot of work; you have to consider many subtle semantic conditions. Below is the Simple Smart Pointer (SSP) template class we built; you can use it in place of standard pointers in C++.
template <typename Q>
class SSP
{
    public:
        SSP(Q* pItf = 0) : m_pItf(pItf)
        {
            if(m_pItf)
                m_pItf->AddRef();
        }

        ~SSP()
        {
            if(m_pItf)
                m_pItf->Release();
        }

        Q* operator->()
        {
            return m_pItf;
        }

        operator Q*()
        {
            return m_pItf;
        }

        void** GetItfPointer()
        {
            if(m_pItf)
            {
                m_pItf->Release();
                m_pItf = 0;
            }
            return (void**)&m_pItf;
        }

    private:
        Q* m_pItf;
};
|
Client code that uses this smart pointer is shown below. Note the conspicuous lack of a Release call before the function returns. Typically, this bug would leave the component thinking that it still has an outstanding reference. In this case, however, the smart pointer's destructor automatically calls Release when the pointer goes out of scope. The smart pointer also calls AddRef on the IUnknown interface pointer and then calls Release when the function returns.
void TestSSP(IUnknown* pUnknown)
{
    SSP<IUnknown> sspUnknown(pUnknown);
    SSP<ISum> sspSum;

    HRESULT hr = sspUnknown->QueryInterface(IID_ISum,
        sspSum.GetItfPointer());
    if(FAILED(hr))
        cout << "IID_ISum not supported" << endl;

    int sum;
    hr = sspSum->Sum(2, 3, &sum);
    if(SUCCEEDED(hr))
        cout << "Client: Calling Sum(2, 3) = " << sum << endl;
}
|
Built-in smart pointer support in Visual C++ Microsoft has defined a set of complex smart interface pointer classes as part of the Microsoft Foundation Classes (MFC), ATL, and the Visual C++ compiler's built-in support for COM+ in the header files comdef.h, comutil.h, and comip.h. Each of these smart interface pointers has unique quirks, which makes switching from one to another difficult. For the sake of this nonpartisan discussion, we'll examine the smart interface pointer provided with Visual C++.
The Visual C++ smart pointer template classes are used in the code generated by the compiler in response to the type library specified by the #import statement. The fundamental template class defined by Microsoft is _com_ptr_t. The _com_ptr_t template class is a smart pointer implementation that encapsulates interface pointers and eliminates the need to call the AddRef, Release, and QueryInterface methods of the IUnknown interface. In addition, it wraps the call to CoCreateInstance(Ex) when you instantiate a new COM+ object. The _COM_SMARTPTR_TYPEDEF macro establishes typedefs of COM+ interfaces as template specializations of the _com_ptr_t template class. For example, the following code
_COM_SMARTPTR_TYPEDEF(ISum, __uuidof(ISum)); |
is expanded by the compiler into:
typedef _com_ptr_t<_com_IIID<ISum, __uuidof(ISum)>> ISumPtr; |
You can then use the ISumPtr type in place of the raw interface pointer ISum*. To instantiate an object, you declare a variable of type ISumPtr and pass the CLSID of the coclass to the constructor, as shown here:
ISumPtr myRef(__uuidof(InsideCOM)); |
The smart pointer's constructor calls CoCreateInstance(Ex), followed by QueryInterface for the ISum interface. Now you can use myRef to call methods of the ISum interface with code nearly identical to that used with dumb pointers:
int result = myRef->Sum(5, 13); |
Notice that the value returned by the function is not an HRESULT but the actual sum previously returned via a pointer in the third parameter. The compiler notices that the parameter is marked as [out, retval] in the type library, and, as shown in the following code, it generates a wrapper function in the .tli file that provides the real return value:
int __inline ISum::Sum ( int x, int y ) {
    int _result;
    HRESULT _hr = raw_Sum(x, y, &_result);
    if (FAILED(_hr))
        _com_issue_errorex(_hr, this, __uuidof(this));
    return _result;
}
|
This code ends without calls to AddRef or Release since the smart pointer fully automates reference counting. Before you call CoUninitialize, however, it is important to set the smart pointer to NULL, as shown in the following code fragment, to force a call to Release. After CoUninitialize, any attempts by the smart pointer to call Release in the destructor will crash.
myRef = NULL; CoUninitialize(); |
Here you can begin to see flaws in the smart pointer approach. Although the idea of smart interface pointers is initially appealing, in practice it is difficult to build a bulletproof smart pointer. And if you do build a smart pointer without any holes, it will probably be too restrictive for practical use. Using a smart pointer does not absolve you of the responsibility of understanding COM+'s lifetime reference counting rules. In fact, it requires that you become intimately familiar with the implementation details of the smart pointer in addition to understanding IUnknown.
If you like Microsoft's smart pointer template classes but are not keen to have the C++ compiler generate code based on a type library, you can use the smart pointer classes directly simply by including the comdef.h header file. The client application, shown in Listing 3-4, uses these header files to call the component we created in Chapter 2. Be sure to compile and link this file with the component_i.c file generated by the MIDL compiler.
smartpointerclient.cpp
#define _WIN32_DCOM
#include <comdef.h>    // Defines the smart pointer class
#include <iostream.h>
#include "component.h" // Generated by MIDL

void main()
{
    CoInitializeEx(NULL, COINIT_APARTMENTTHREADED);
    _COM_SMARTPTR_TYPEDEF(ISum, __uuidof(ISum));
    ISumPtr myRef(CLSID_InsideCOM);
    int result;
    myRef->Sum(5, 13, &result);
    cout << "Client: 5 + 13 = " << result << endl;
    myRef = NULL;
    CoUninitialize();
}
|
Listing 3-4. A C++ client that uses the smart pointer template classes provided with Visual C++.
By default, the .tlh file generated by the compiler in response to the #import directive is enclosed in a namespace with its name lifted from the library statement in the original IDL file. A namespace is a declarative region that attaches an additional identifier to any names declared inside it. The additional identifier makes it less likely that a name will conflict with names declared elsewhere in the program. C++ provides a single global namespace by default, which can cause problems when global names clash. For example, you might want to import two different type libraries that contain identically named items into the same C++ source file. Normally, this is not a problem for COM+ since everything works based on GUIDs. The #import directive, however, enables COM+ objects to appear almost as standard C++ objects, with the GUIDs hidden in the compiler-generated code.
These two C++ header files illustrate the problem:
// one.h
class Math { ... };

// two.h
class Math { ... };
|
With these definitions, it is impossible to use both header files in a single program because the Math classes will clash. Namespaces in C++ address this problem. You can use the identical names in separate namespaces without conflict even if the names appear in the same translation unit. As long as the names are in separate namespaces, each will be unique because of the addition of the namespace identifier.
You use the C++ namespace keyword to declare a namespace, as in these examples:
// one.h
namespace one
{
    class Math { ... };
}

// two.h
namespace two
{
    class Math { ... };
}
|
Now the Math class names will not clash because they have become one::Math and two::Math.
Declarations made outside all namespaces are still members of the global namespace. You can use the names from a namespace by using an explicit qualification with the namespace name (one::Math) or by selecting a namespace using the using keyword, as shown here:
using namespace two; Math x(); // Refers to two::Math |
When you use the #import directive, you can suppress the generated namespace by specifying the no_namespace attribute, as shown here:
#import "component.dll" no_namespace |
Be aware that suppressing the namespace can lead to name collisions if you import multiple type libraries from different components. This example uses only one component, so specifying the no_namespace attribute to avoid dealing with namespaces does not create a problem.